 The broccoli seeds we started ten days ago, have sprouted! Smiles and high-fives were exchanged when we saw green leaves pushing through the dark potting soil. It was a great opportunity to show my three daughters nature in action. It’s amazing to plant a tiny little seed and watch it emerge from the depths of the soil.
We removed the plastic cover and moved the new seedlings under fluorescent lights. To keep the little sprouts from being leggy, we placed the tray about two to three inches below the fluorescent light. If the light is too far away, the seedling stretches toward the light and becomes leggy. Leggy plants have long spindly stems that are weak. If this happens to you, it’s really hard to correct. In my opinion, it’s easier to start over than correct the problem.
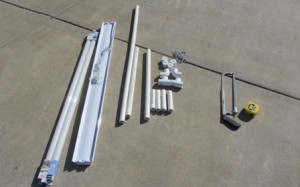
A few years ago, I attended at Junior Master Gardener training class led by K-State research and extension specialist, Evelyn Neier. She showed us how to make a simple PVC pipe light stand. It’s a relatively inexpensive way to construct an effective plant stand. I bought all of the supplies for $39.15 and it took me about 20 minutes to cut the PVC and assemble the light stand (that with a toddler sitting on my lap).
 Materials Needed:
- 10’ section 1” PVC pipe
- 2 L shaped 1” PVC connectors
- 2 T shaped 1” PVC connectors
- 4 1” PVC end caps
- 2 pieces of chain
- S hooks to attached light fixture to the chains
- 1 standard shop light
- 2 fluorescent lights
Tools:
- Hacksaw
- Measuring tape
- Pencil or marker
 Assembly:
1. Measure and cut pipe into the following lengths:
four 6” long sections
two 24” long sections
one 48” long section
2. Put caps on one end of each 6” section.
3. Connect two 6” sections with the T shaped connector. This makes the foot.
4. Complete the same step on the other two 6” sections. This is the second foot.
5. Connect the 24” section to the middle hole in the foot you just made.
6. Complete the same step on the other foot.
7. Put the L shaped connectors on the top of each 24” sections.
8. Connect the two legs with the 48” long section.
9. Adjust feet so they are parallel.
10. To facilitate moving and storing the light stand, do not glue the connectors.
11. Hang the light fixture with chains from the 48” crossbar.
12. Adjust chain length to regulate height of the light fixture.
The completed light stand is light and durable enough for two of my three girls to help move it. We placed the light stand in the basement and set our tray of sprouted seedlings directly under the grow light. We adjusted the light so that it is only two to three inches above the top of the seedlings.
Generally, seedlings need 14 to 16 hours of light, to make enough food to grow healthy stems and leaves. They also need eight hours of rest, without the direct light. As your seedlings grow, be sure to raise the lights up so that they remain two to three inches above the top of the seedlings.
When the seedlings have two to four sets of leaves, it’s time to start feeding them with fertilizer. A weak solution of fertilizer is all that the tender seedlings need. Once a week, I use 1/4 of a teaspoon in one gallon of water. Without fertilizer, your seedlings will not get the adequate nutrients they need to grow into strong healthy plants, ready to be transplanted into your garden.
We check the soil moisture every day. If the soil is dry, we water from the bottom up. That means, we fill the bottom tray with a little bit of water. The water is soaked up like a sponge, and it does not disrupt the top of the soil or seedlings.
I hope that your “starting seed” experience has been successful! Good luck building the PVC pipe light stand. I challenge you to build it with a toddler on your lap, proving once again that gardeners (and Mom’s) can do it all!


